
Monday, December 21, 2020
Tuesday, October 20, 2020
Monday, October 19, 2020
Friday, October 16, 2020
Wednesday, October 14, 2020
Download Koha 20.05 iso
Download latest Koha 20.05 on ubuntu 20.04 iso by clicking on below link:
https://drive.google.com/file/d/1NXw55n2fR78Xw-LaBrMTvR-TBsEOFOBV/view?usp=sharing
Ubuntu Password required during Installation: 123456
Koha Username : Zeeshan1
Password: Zeeshan1
Koha Librarian Interface: localhost:8000
Koha OPAC: localhost
Monday, October 12, 2020
Saturday, October 10, 2020
Sunday, September 20, 2020
Koha 20.05 Installation on Ubuntu 20.04
Installation Koha 20.05 on Ubuntu 20.04
1st Step:
Type
these commands in terminal. To open terminal either you can press
CTRL+ALT+T together or open through GUI.
Then Type:
$
sudo
su
(enter password, it will not be visible so be careful. Here
you have to enter the same password which you have given at the time
of installation).
Update
Ubuntu
#
sudo
apt-get update
#
sudo
apt-get upgrade
Add
Koha community repository
#
echo
deb http://debian.koha-community.org/koha stable main | sudo tee
/etc/apt/sources.list.d/koha.list
#
wget
-O- http://debian.koha-community.org/koha/gpg.asc | sudo apt-key add
-
Update
the software repository
#
sudo
apt-get update
Install
Koha
#
sudo
apt-get install koha-common
Server
configuration
#
sudo
nano /etc/koha/koha-sites.conf
Here I change the port
number of Koha staff client to 8000. Find the following line in the
file and make changes.
INTRAPORT="8000"
Install
MySQL server
#
sudo
apt-get install mysql-server
Koha
instance creation
Apply
following commands to create Apache configuration files.
#
sudo
a2enmod rewrite
#
sudo
a2enmod cgi
#
sudo
service apache2 restart
Create
a Koha instance with the name library
#
sudo
koha-create --create-db library
Add
new port
Open
the following file and add a new port.
#
sudo
nano /etc/apache2/ports.conf
Copy paste following line
below Listen 80
Listen 8000
Restart
Apache
#
sudo
service apache2 restart
Enable
modules and sites
#
sudo
a2dissite 000-default
#
sudo
a2enmod deflate
#
sudo
a2ensite library
#
sudo
service apache2 restart
Check
Koha Master Pssword (master
password can be changed any time)
# sudo koha-passwd library
(this command will generate a password for koha. You need to copy that password and save it with yourself, because it will be required in koha web installation Step.
rfOpLNGIPg7bQNb@
-----------------------1st Step of Koha Installation Completed----------------------
2nd Step:
Open
the browser and type the following:
For Koha Staff
Interface: http://localhost:8000
For Koha OPAC :
http://localhost
1. Type http://localhost:8000 in web browser
2. Give User name: koha_library
3. Password: (type that password which you have copied earlier and press enter)
4. Cllick on Contrinue to the next step
5. Cllick on Contrinue to the next step
6. Cllick on Contrinue to the next step
7. Cllick on Contrinue to the next step
8. Cllick on Contrinue to the next step (wait for some time when it appears Database tables created then
9. Cllick on Contrinue to the next step
10. Cllick on Contrinue to the next step
11. Select MARC21 and then click on continue to the next step
12. select your required fields and then click on Import button.
13. Basic installation completed now click on setup up some of koha’s bsir requirement
14.
Tuesday, September 15, 2020
How to create Administrator Account in Dspace
> Open Terminal
> Type: sudo su
> type your root password and press enter
> root@localhost:/opt# sudo /opt/dspace/bin/dspace create-administrator
> Creating an initial administrator account
> E-mail address: (type an email address for administrator of dspace e.g. zeeshan@gmail.com)
> First name: Zeeshan
> Last name: Khattak
> Password: (Type password and then press enter button (Note: password will not be displayed))
> Again to confirm: (type the password again and press enter button)
> Is the above data correct? (y or n): Y
> Administrator account created
> root@localhost:/opt#
Tuesday, September 8, 2020
Monday, September 7, 2020
How to insert Text and Logo in Koha Staff Login Page
1. > go to koha administration
2. > Click on Global system preferences
3. > Click on Staff Client
4. > Go to StaffLoginInstructions
5. > Click on Edit
6. > paste below commands
<p><b><center><img
src="https://blogger.googleusercontent.com/img/b/R29vZ2xl/AVvXsEjbI8Ry3A7KtKuaIHUaL-ztpbiRVqlXg0KMKNUqhaqoci1v3XDB-14NTqvgp9afa5WTAigJO9JdogON6eIknVKIxcytGL0moYD3hRaukW_wQ4GyKWAvR3D3VywwGGV4ZDi8nRsBxl-ppEE/s0/RMI+Logo.png" height="150" width="150">
<p><b><center> <font color="BLUE" size="4"><center> <marquee>Welcome to RMI Library</marquee></center></font>
<p><b><center> <font color="darkblue" size="4"><center> LIBRARY STAFF LOGIN </center></font>
7. > click on save all preferences
Tuesday, July 28, 2020
Thursday, July 23, 2020
Wednesday, July 22, 2020
Tuesday, July 21, 2020
Monday, July 20, 2020
Saturday, July 18, 2020
Tuesday, July 14, 2020
Tuesday, February 18, 2020
Download Latest Koha 19.11 iso file
https://drive.google.com/file/d/1T0StyG4R41qDRGN4w9KGQp0N5iKNECl9/view?usp=sharing
This iso file also includes Caliber Digital Library Management Software.
Important:
Koha User name : 1
Koha Password: Ab1
Ubuntu Root user: root
Ubuntu root Password: 123456
Zeektk_Koha19.11 iso
Sunday, February 16, 2020
how to install dspace on ubuntu 18.04
- Log in:
- $ ssh -i keypair2.pem ubuntu@3.80.31.85
- Update Ubuntu patches to latest packages:
- $sudo apt update
- $sudo apt upgrade (note: when upgrading, choose “install the package maintainer’s version” typically works well)
- Install required system applications: (openjdk-8, postgresql, ant, and maven)
- $sudo apt install openjdk-8-jdk postgresql ant maven
- Create Ubuntu user “dspace” with directory “/dspace” and let user “dspace” owning directory “/dspace”
- $sudo useradd -m dspace
- $sudo passwd dspace
- $sudo mkdir /dspace
- $sudo chown dspace /dspace
- Become user “postgres” so that it can create postgreSQL database user
- $sudo su postgres
- Create a new PostgreSQL user
- $createuser -U postgres -d -A -P dspace
- Enter password for new role:
- Enter it again:
- $exit
- Ubuntu user “dspace” to create database “dspace”
- $sudo -u dspace createdb -U dspace -E UNICODE dspace
- Be ubuntu user “postgres” and enable postgreSQL extension “pgcrypto” for hash function. (a regular Postgres extension. Install it once per database)
- $sudo su postgres
- $psql –username=postgres dspace -c “CREATE EXTENSION pgcrypto;”
- Exit to be user “ubuntu” again.
- $exit
- Allow database user “dspace” to connect to PostgreSQL
- $sudo nano /etc/postgresql/10/main/pg_hba.conf
- go to the last line, add “local all dspace md5“
- save and close the file
- Restart postgreSQL (to make the change effecitve)
- $sudo /etc/init.d/postgresql restart
- Create “/build” directory for compiling and installation
- $sudo mkdir /build; sudo chmod -R 777 /build; cd /build
- Download Dspace to “/build” directory and extract DSpace tar file
- $wget https://github.com/DSpace/DSpace/releases/download/dspace-6.3/dspace-6.3-src-release.tar.gz
- $ tar -zxf dspace-6.3-src-release.tar.gz
- $ cd /build/dspace-6.3-src-release
- Ensure appropriate Java version.
- $sudo update-alternatives --config java (type 2)
- Compile Dspace package
- $ mvn -U package
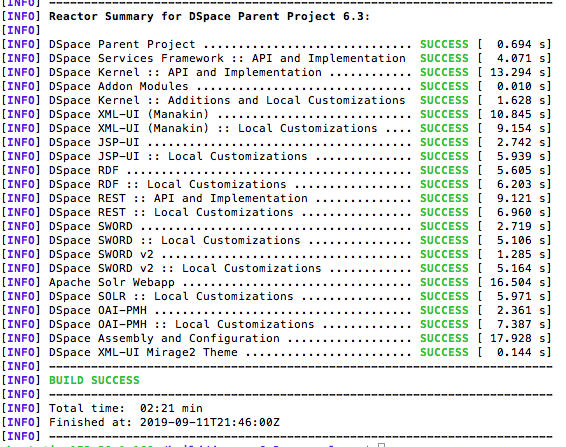
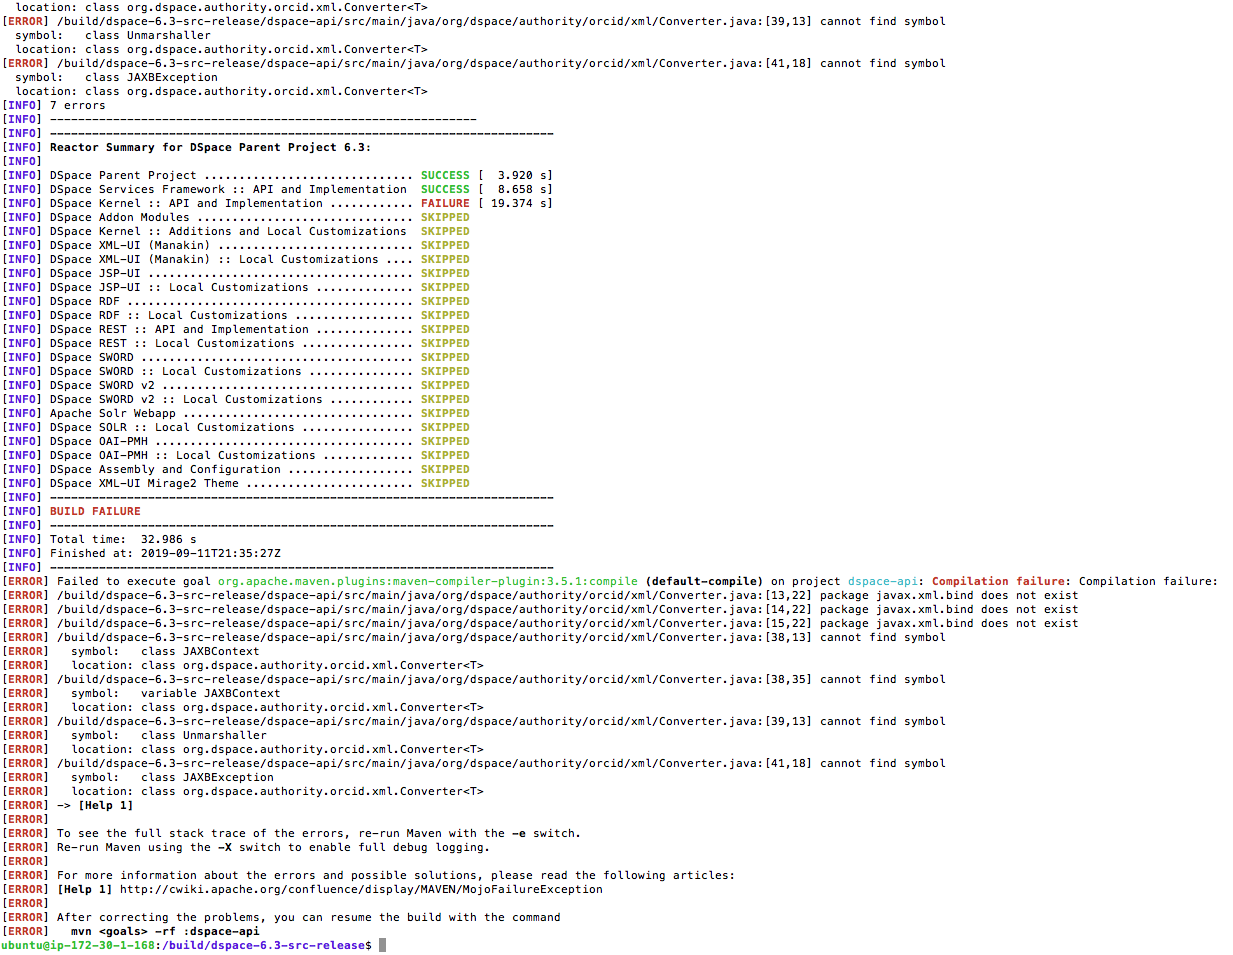
- Note: you shall see results like this
- If you see “BUILD FAILURE” like this, you need to update java version to use “openjdk-8”, Ubuntu 18.04 LTS carries java 11, which will fail the compile. Go to previous step to choose right java version and re-compile.
- Install DSpace
- $ cd /build/dspace-6.3-src-release/dspace/target/dspace-installer
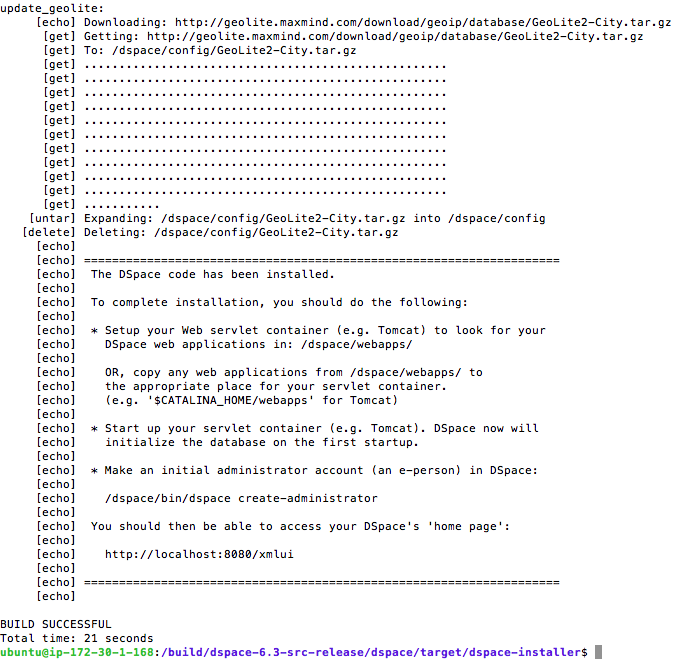
- $sudo ant fresh_install
- Install Tomcat
- $sudo cd /opt; sudo wget https://archive.apache.org/dist/tomcat/tomcat-8/v8.0.37/bin/apache-tomcat-8.0.37.tar.gz
- $sudo tar xvzf apache-tomcat-8.0.37.tar.gz
- $sudo ln -s apache-tomcat-8.0.37 tomcat
- Set Tomcat environment variables
- $sudo nano /etc/profile
- copy/paste to the last line”
export JAVA_HOME=/usr/lib/jvm/java-8-openjdk-amd64
export CATALINA_HOME=/opt/tomcat “ - save and close the file.
- Copy DSpace webapps to Tomcat websapps (so that Tomcat will run DSpace webapps)
- $sudo cp -r /dspace/webapps/* /opt/tomcat/webapps
- Run Tomcat
- $sudo /opt/tomcat/bin/startup.sh
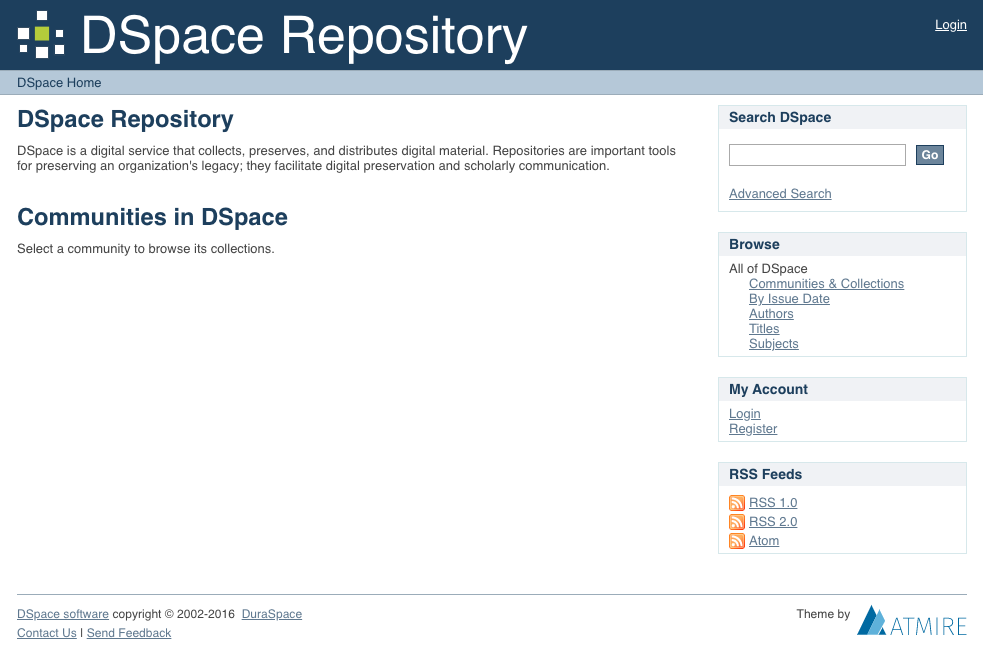
- Open an browser, enter “ip:8080/xmlui” for XMLUI interface, you shall see this. This is nice.

- Interfaces:
- JSP: residing in /jspui/. To access: enter [IP}:8080/jspui/. Example: http://www.afghandata.org:8080/jspui/
- XMLUI: residing in /xmlui/. To access: enter [IP}:8080/xmlui/. Example: http://www.afghandata.org:8080/xmlui/
- Create adminstrative account:
- $sudo /dspace/bin/dspace create-administrator
.png)